AI Video from Mood Boards: Using Seedance Reference Mode
Mood boards are the universal starting point for creative work. Here's how to turn yours directly into AI video using Seedance 2.0 Reference.

Every good video project starts with a mood board. Every AI video tool ignores it. That has been the single most frustrating gap in AI video for creatives: you have the exact visual reference for what you want, and the tool asks you to describe it in English instead.
Seedance 2.0 Reference fixes that. Your mood board is the input.
TL;DR
- Upload your mood board images (up to 9) as reference input
- Get AI video that actually matches the board's aesthetic
- Pricing: $0.3024/sec, ~$3-$9 per clip
- Works for directors, art directors, agencies, and solo creators
- Mood board consistency becomes output consistency
- Try it free with 50 credits
The Mood Board Gap in AI Video
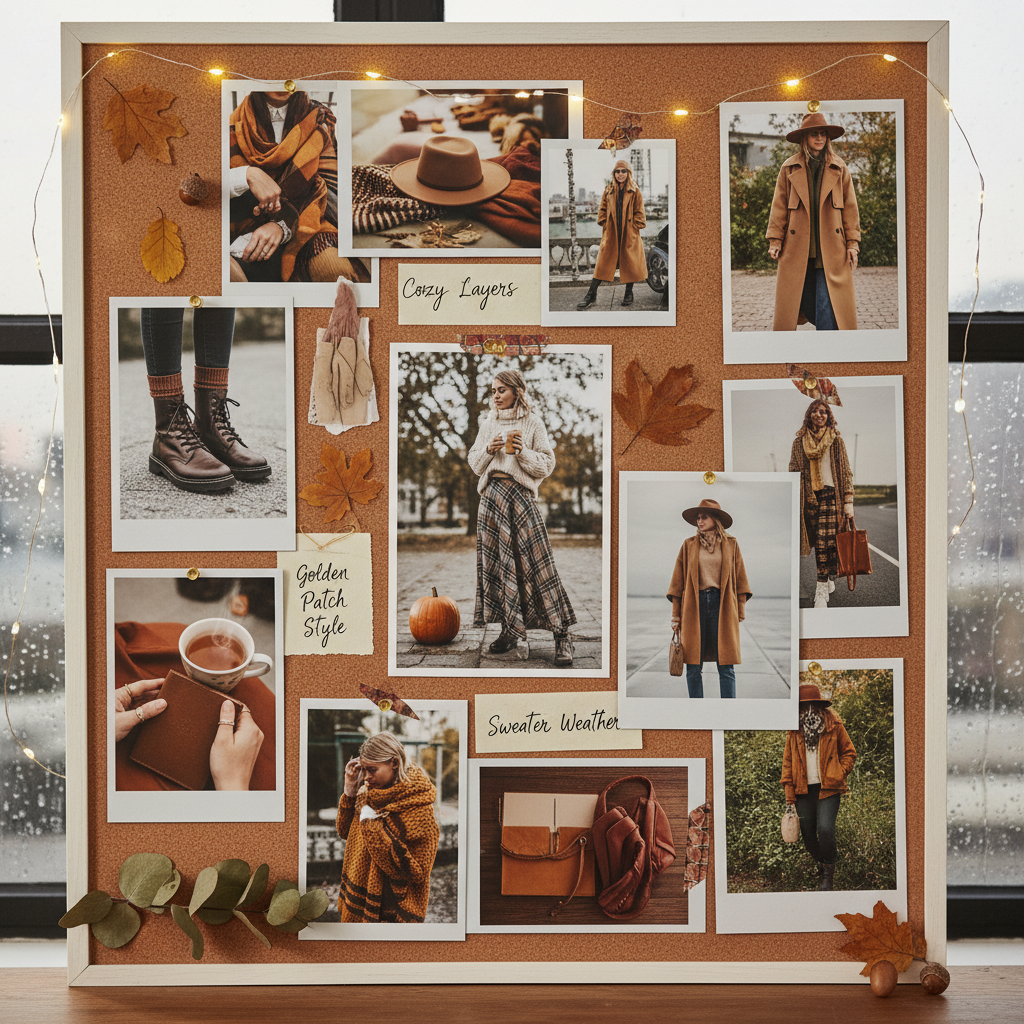
Creative work has used mood boards forever. They're how you show a client, a director, or a DP what you want without having to describe it. They work because visual language is faster than verbal language.
AI video models broke that workflow. Suddenly you had to describe your mood board in a prompt — compressing dozens of visual attributes into a few sentences that the model could misinterpret. Half the time the output didn't even look related to the board.
Reference mode restores the original workflow. Upload the board. Get the output.
Mood Board Curation for Reference Mode
Good mood boards for reference mode share traits with good mood boards in general, with a couple of tweaks.
Stay tight. A 30-image mood board is great for client presentations. For reference mode, you'll use 6-9 of the strongest images. Pick them ruthlessly.
Prioritize the visual attributes you can control. Reference mode controls color, lighting, composition, grain, and texture. It doesn't control subject matter or plot — that comes from the prompt. So your 9 reference images should be chosen for their style, not their subject.
Include a hero frame. One image that is your "this, exactly" shot. The rest are context and variation.
Avoid stylistic contradictions. Two moods in the same board will average toward neither. If your board has distinct sections (day and night, interior and exterior), consider running separate generations with different image subsets.
The Mood Board to Video Workflow
Step 1: Export your mood board images. Pull the 9 strongest from wherever your board lives (Milanote, Figma, Pinterest, a folder on your desktop). Save them locally.
Step 2: Upload to Seedance 2.0 Reference. All 9 go into the image reference input.
Step 3: Write a subject prompt. Describe what's happening, not what it looks like. The board is handling the look.
Step 4: Set duration. 5 seconds for style tests, 8-15 seconds for final output.
Step 5: Generate. 60-180 seconds later you have a video that looks like your board came to life.
Step 6: Iterate on the prompt until the subject/action is right. Keep the references locked.
Turn your board into video now. Export 6-9 mood board images and run your first test. Start free with 50 credits.
Mood Board Source Rights
Quick note on sourcing: mood boards are typically gathered for internal creative reference. When you use those images as input to an AI generation, the output is a new work inspired by the style of the references — but the references themselves aren't reproduced in the output.
This is legally and ethically similar to how human creative teams have always used mood boards. That said, if you're producing commercial work, check the platform terms and consider using only rights-cleared imagery for any reference that might influence specific visual elements closely.
For brand-safe workflows, build reference bundles from your own existing creative and stock you've licensed.
A Worked Example: From Pinterest Board to Video
Scenario: A client wants a "gritty but hopeful" coming-of-age short. You've built a Pinterest board with 40 images over two weeks.
Cut down to 9:
- Wide shot of suburban street in late light
- Kid on a bike silhouetted against sunset
- Kitchen interior with window light
- Close-up of hands holding a cassette tape
- Railroad tracks at dusk
- Film grain texture reference
- Specific warm color grade example
- Wes Anderson-ish symmetrical framing
- Hero frame — your "this, exactly" image
Prompt for test shot:
A kid rides a bike down an empty suburban street at sunset,
wide tracking shot, 6 seconds
The test output should feel like the board moved. Color should match. Lighting should match. Composition should lean toward your hero frame's vibe. If it does, you have a repeatable setup for the whole project.
Using the Same Board Across a Project
Once your test shot lands, lock the reference bundle. Every additional clip in the project uses the same 9 images. You vary only the prompts.
For a 15-shot short, that's 15 generations with the same bundle. The clips will feel like they belong together because they share a style vector — not because you got lucky with prompts.
Try Seedance 2.0 Reference — multi-modal video generation
Upload your mood board. Get matching AI video. 50 free credits, no card required.
Try Seedance 2.0 Reference FreeMood Board Formats That Work
Pinterest boards: Pull down the best 9 images via right-click-save or Pinterest's native download.
Figma frames: Export individual frames as PNG/JPG at reasonable resolution.
Notion/Milanote: Download the images directly from the cards.
Folder of desktop images: Drag-and-drop into the upload zone.
The model is pretty forgiving about image resolution — anything 512px or larger on the short edge will work. Don't upload 4K files; they'll just take longer to process without adding quality.
Mood Board Types and Their Fit
Film stills moodboard: Excellent fit. Film stills are color-graded, composed, and lit intentionally, which gives the model strong signal.
Photography moodboard: Strong fit. Similar to film stills, especially for editorial or cinematic photography.
Illustration/concept art moodboard: Works but trickier. The model will blend illustrative style with its inherent photorealism, which can produce interesting hybrid output.
Texture/pattern moodboard: Partial fit. Textures influence grain and surface treatment but won't give the model enough compositional signal alone.
Typography/graphic design moodboard: Poor fit. Type-heavy references don't translate to video style. Use traditional design tools for those elements.
Mood Board + Prompt: The Division of Labor
Keep the split clean:
| Mood Board Handles | Prompt Handles | |---|---| | Color palette | Subject / who is in shot | | Lighting style | Action / what happens | | Framing philosophy | Camera movement | | Texture / grain | Location / setting | | Overall vibe | Duration beat |
If you catch yourself writing style language in the prompt, stop. The board is already saying that louder than words.
When to Swap Boards Mid-Project
Usually never. Style consistency across a project comes from bundle consistency.
Exceptions:
- Distinct episodic sections with genuinely different looks (daytime ep vs nighttime ep)
- Time jumps that should feel visually different (flashback sequences)
- Dream sequences that want to feel detached from reality
In each case, use a "base" bundle of 4-5 images that stays constant across both variants, plus 2-4 variant-specific images that shift for the different sections. That way the two looks feel related even while being different.
Pricing for Mood Board Work
The cost is identical to any other Reference mode generation:
| Duration | Credits | Cost | |---|---|---| | 4 sec test | 243 | $2.42 | | 8 sec standard | 484 | $4.84 | | 15 sec hero | 907 | $9.07 |
A typical mood-board-driven 10-shot short costs ~$40-$60, well within the $50 Pro tier.
From Moodboard to Final Cut in a Day
A workflow that works:
- Morning (2 hours): Finalize your 9-image mood board
- Mid-morning (1 hour): Write 10-15 shot prompts based on script/concept
- Afternoon (2-3 hours): Generate all shots, review, iterate on misses
- Late afternoon (2 hours): Edit to timeline in DaVinci Resolve or similar
You ship a complete short in one day. The mood board is the only prep work you need that you were going to do anyway.
Next Reads
For the style foundation, read the style-consistent tutorial. For the full multi-modal stack, see the multi-modal guide. For longer-form work, the storyboarding tutorial is a natural follow-up.
Your mood board is now the most powerful input in AI video. Treat it that way.
Upload your mood board now
Your existing board is all you need. Get matching video in under 3 minutes. 50 free credits.
Start Creating Free