How to Generate Photorealistic Images with Seedream v3
Master photorealistic AI image generation with Seedream v3. Learn guidance scale settings, prompt engineering techniques, lighting descriptions, and advanced tips for creating convincing real-world imagery.

Most AI image generators have a "look." Cranked saturation, hyper-sharp edges, the unmistakable sheen of an algorithm trying too hard. Seedream v3 can avoid all of that — if you know which dials to turn. The default settings will get you 70% of the way. The remaining 30% is the difference between "clearly AI" and "wait, is this real?"
This guide walks through every technique that actually matters.
TL;DR
- Use
guidance_scale6-8 for photorealism — 7 is the safe default - Describe lighting explicitly (direction, quality, time of day)
- Include camera/lens keywords (85mm, shallow DOF, Canon EOS R5)
- Add "natural skin texture, pores visible" to portraits to defeat AI-smooth skin
- Keep seeds locked during iteration to see exactly what each prompt change does
Why Seedream v3 Works for Photorealism
Three specific reasons Seedream v3 is suited for photorealistic work:
1. Natural color reproduction. Unlike generators that default to oversaturated, hyper-vivid colors, Seedream v3 produces balanced color grading that looks like actual camera output. Colors are the foundation — if they look artificial, nothing else matters.
2. Adjustable guidance scale. The guidance_scale parameter gives you precise control over how literally the model follows your prompt. For photorealism, this balance is everything — too literal and images look synthetic, too loose and they drift.
3. Strong texture rendering. Skin, fabric, metal, glass, wood, water — Seedream v3 handles real-world materials convincingly.
At $0.06 per generation, iterating to perfection is affordable. Most photorealistic results need 3-8 attempts; even 10 attempts cost $0.60. See the complete Seedream v3 guide for platform basics.
Try the prompt yourself
Test the exact photorealistic techniques in this guide — 50 free credits, no card required.
Try Seedream v3 FreeThe Guidance Scale Sweet Spot
guidance_scale is your most important photorealism tool. Here is how to use it:
The Default: 6-8
For most photorealistic images, guidance scale 6-8 produces the best results:
- Strong prompt adherence without over-rendering
- Natural-looking details without artificial sharpening
- Realistic color distribution without oversaturation
- Subtle imperfections that make images look real
Start at 7. Adjust from there based on results.
When to Go Lower (4-6)
Lower guidance produces softer, more natural images. Use it for:
- Atmospheric landscapes with natural haze
- Soft-focus portrait backgrounds
- Dawn/dusk scenes with gentle edges
- Dreamy, romantic aesthetics
- Street photography and documentary work
When to Go Higher (8-10)
Higher guidance increases detail and prompt fidelity. Use it for:
- Product photography where every detail matters
- Architectural shots with sharp geometric lines
- Food photography with crisp texture detail
- Technical/documentation images
The Ceiling
Never exceed 12 for photorealistic images. Above that, you almost always get artifacts — oversaturated colors, unnatural sharpness, and the dreaded synthetic "HDR look." If you need higher prompt adherence, improve your prompt wording instead of cranking guidance.
Anatomy of a Photorealistic Prompt
A strong photorealistic prompt has five components. Skip any of them and you are leaving quality on the table.
1. Subject (specific, not vague)
"A woman" is useless. "A 30-year-old woman with shoulder-length dark hair, wearing a navy wool coat" gives the model something to work with. Physical details, clothing, expression, pose.
2. Setting (real-world specificity)
"A busy street" becomes "a rain-slicked cobblestone street in Prague, overcast afternoon, pedestrians with umbrellas in the background."
3. Lighting (the single biggest factor)
Covered in depth below. Do not skip it.
4. Camera/Technical Details
Photography vocabulary cues the model toward camera-like output. Focal length, depth of field, camera model, film stock.
5. Style/Quality Anchors
"Photorealistic, professional photography, raw photo, unedited, natural" — explicitly anchor the generation toward photography.
A Complete Example
Professional food photograph of a rustic sourdough bread loaf on a dark
wooden cutting board, freshly sliced with a serrated knife beside it,
warm morning light streaming from the left through a kitchen window,
shallow depth of field, shot on Canon EOS R5 with 85mm f/1.4 lens,
natural colors, editorial food photography style
Every component is present: subject, setting, lighting, camera, style. For more prompting techniques, see our Seedream v3 prompt guide.
Want photorealism like this? Try Seedream v3 free →
Ready to try Seedream v3? Start creating free →
Lighting Descriptions That Actually Work
Lighting transforms images from decent to photorealistic. Here are the most effective lighting keywords for Seedream v3:
Natural Lighting
| Keyword | Effect | |---|---| | Golden hour | Warm, directional, long shadows | | Blue hour | Cool ambient twilight, soft gradients | | Overcast | Soft, even, minimal shadows | | Harsh midday sun | Strong contrast, short shadows | | Dappled sunlight | Filtered through leaves/trees | | Window light | Directional indoor light with falloff |
Studio Lighting
| Keyword | Effect | |---|---| | Rembrandt lighting | Classic portrait, triangle highlight | | Butterfly lighting | Front-down, symmetrical shadows | | Split lighting | One side lit, one in shadow | | Rim lighting | Backlight outlining subject | | Softbox lighting | Even, professional diffused | | Three-point lighting | Standard portrait/product setup |
Atmospheric Lighting
| Keyword | Effect | |---|---| | Volumetric light | Visible rays through dust/fog | | Neon glow | Colored artificial lighting | | Candlelight | Warm, flickering, intimate | | Moonlight | Cool, pale, atmospheric | | Backlit | Silhouette or edge-lit |
Combining Lighting Terms
The most realistic results come from combining lighting type, direction, and quality:
"Soft window light from the left, slightly backlit, warm afternoon tones"
...is dramatically more effective than "natural light." Three specific attributes, not one vague one.
Camera and Lens Keywords
Photography-specific terminology signals the model to produce camera-like output.
Lens focal lengths:
- "85mm portrait lens" — classic flattering portrait perspective
- "35mm wide angle" — environmental, natural
- "200mm telephoto" — compressed, distant
- "50mm f/1.4" — natural field of view with shallow DOF
Depth of field:
- "Shallow depth of field" — blurred background, focused subject
- "Bokeh background" — beautiful background blur
- "Deep focus" — everything sharp
- "Tilt-shift" — miniature effect
Camera models:
- "Shot on Canon EOS R5"
- "Nikon Z9"
- "Sony A7IV"
- "Hasselblad medium format"
Film stocks (for specific looks):
- "Kodak Portra 400" — warm, natural skin tones
- "Fujifilm Velvia" — saturated landscape film
- "Ilford HP5" — classic black and white
What works best: Short-to-medium telephoto (50mm-135mm) with shallow DOF produces the most convincing photorealistic portraits. Wide angle (14mm-35mm) works well for landscapes and architecture.
Material and Texture Rendering
Seedream v3 renders materials convincingly when you describe them specifically.
- Metals: "brushed stainless steel," "polished copper," "weathered bronze," "matte aluminum"
- Fabrics: "raw silk," "worn denim," "cashmere knit," "linen texture"
- Natural: "rough bark," "wet river stone," "frost crystals," "sea foam"
- Food: "crispy crust," "glistening sauce," "fresh-cut cross section," "condensation on glass"
- Architectural: "exposed concrete," "aged brick," "polished marble," "patinated copper roof"
The key is specificity. "Metal" is vague. "Hand-hammered copper with green patina" gives the model clear textural direction.
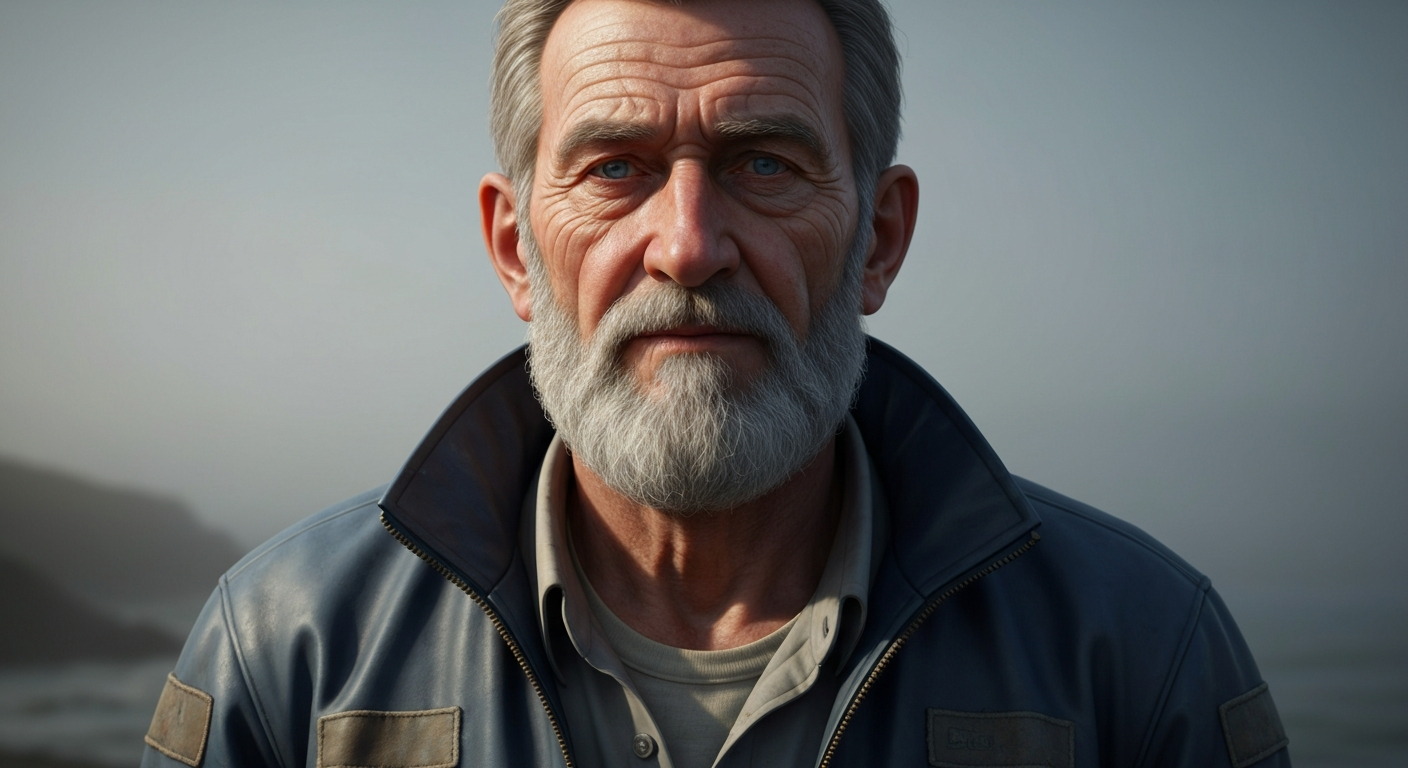
Portrait Photography Techniques
Portraits are the most demanding photorealistic application. Here is how to defeat the AI-smooth skin problem and get convincing results.
Skin: The Biggest Giveaway
Default AI output smooths skin unrealistically. Counter it with:
natural skin texture, pores visible, slight imperfections,
photographic skin, unretouched
Add these phrases to portrait prompts. They make an enormous difference. For maximum realism, also mention "light freckles," "laugh lines," or "warm undertones" — specific authentic details.
Eyes and Expression
- "Catchlights in eyes" adds convincing life
- "Sharp focus on eyes" prioritizes eye sharpness
- Describe expression holistically: "warm genuine smile with slight eye crinkle" rather than listing eye color, pupil size, etc.
- Specify gaze: "looking directly at camera" or "eyes slightly off-center"
Hair
- Describe movement: "wind-blown strands," "loose curls framing face"
- Include light interaction: "hair backlit with golden rim light"
For portrait-specific techniques, see our portrait photography guide.
Landscape and Architecture
Landscapes
- Include atmospheric depth: "distant mountains fading into haze"
- Describe foreground, midground, and background separately
- Mention weather conditions: "partly cloudy sky with cumulus clouds"
- Use seasonal cues: "early autumn with golden aspens and green pines"
Architecture
- Specify architectural style: "Bauhaus modernist," "Victorian Gothic," "Japanese minimalist"
- Describe materials: "floor-to-ceiling glass panels, exposed steel beams"
- Include surrounding context: "nestled in a hillside surrounded by olive groves"
- Use perspective keywords: "shot from ground level looking up," "aerial view"
Product Photography
For e-commerce and commercial product shots:
- Describe background explicitly: "clean white seamless background," "light grey gradient backdrop"
- Specify lighting setup: "softbox from above and left, small fill light from right"
- Mention surface reflection: "slight reflection on glossy surface"
- Include scale references if needed
See the complete product photography guide for detailed workflows.
Stop reading. Start creating.
Put these photorealism techniques to work. Generate 8 images for free — no card required.
Start Creating FreeCommon Mistakes and How to Fix Them
Oversaturated Colors
Cause: Guidance scale too high, too many vivid color descriptors. Fix: Drop guidance to 6-7. Add "natural colors" or "muted tones."
Synthetic Plastic Skin
Cause: AI tendency to smooth skin unrealistically. Fix: Add "natural skin texture, pores visible, photographic quality skin, unretouched." Lower guidance slightly.
Flat, Directionless Lighting
Cause: No lighting direction specified. Fix: Always describe light direction and quality: "soft directional light from upper left."
Impossible Physics
Cause: Complex scenes with conflicting requirements. Fix: Simplify. Generate components separately. Keep compositions to 1-2 subjects.
Generic "AI Look"
Cause: Vague prompts letting the model fall back on defaults. Fix: Be aggressively specific. Add "raw photograph, unprocessed, natural" to counter AI polish.
Advanced: Seed-Based Iteration
This workflow separates amateurs from professionals:
- Generate a batch of 4 with your initial prompt
- Find the image closest to your vision and copy its seed
- Keep the seed locked and change one element of your prompt
- Regenerate — you will see exactly what that single change did
- Repeat until you hit your target
Without seed locking, every regeneration is a new random roll. With it, you are doing actual iterative refinement. This is Seedream v3's most powerful photorealism tool.
Negative Steering
Seedream v3 has no dedicated negative prompt field, but phrasing works:
- "No HDR effect, no oversaturation, no artificial sharpening"
- "Natural imperfections, real-world details"
- "Unstaged, authentic, documentary quality"
Recommended Settings Cheat Sheet
| Use Case | Guidance | Size | Key Additions | |---|---|---|---| | Portrait headshot | 6-7 | 1024x1536 | Camera, focal length, skin texture | | Landscape | 7-8 | 1536x1024 | Atmospheric depth, weather, time | | Product shot | 8-9 | 1024x1024 | Background, lighting setup, material | | Food photography | 7-8 | 1024x1024 | Close-up, garnish, steam/moisture | | Architecture | 7-9 | 1536x1024 | Style, materials, perspective, sky | | Street photography | 5-7 | 1024x1536 | Candid, available light, environment |
FAQ
What guidance scale is best for photorealism? 6-8 for most subjects. 7 is the safe default. Lower (5-6) for atmospheric work, higher (8-9) for sharp product/detail shots. Never exceed 12.
Can Seedream v3 match real camera photos? For many subjects, Seedream v3 produces images difficult to distinguish from real photographs. Complex scenes with multiple people or unusual poses remain more challenging.
How many generations does it take? Expect 3-8 attempts for a strong photorealistic result. Use batch generation (4 images) to explore faster. Even 10 attempts cost under $0.60.
Should I use v3 or v4.5 for photorealism? Both produce strong results. v4.5 handles complex compositions more reliably. v3 is faster and 25% cheaper. Start with v3; move to v4.5 for challenging scenes.
Start creating photorealistic images → — 50 free credits, no card required.